Like rev.0, the PALS webbing on the front bag panel includes four rows of webbing with four vertical channels. This webbing lets you attach virtually any accessory pouch you like. Life is too short to build pouches when you can buy brand new mil spec pouches for less than $20 on eBay, and new imports for less than $10.
The coyote pouch pictured on the rev.0 bag is from a medical kit, is twice the size of the black pouch on rev.1 and will hold one or two batteries, the mic, headphones and a key. And it attaches in a way that provides easy access even when the rig is chest mounted. It is the same width as the main bag.
But the black pouch used on rev.1 is half the size of the coyote pouch, costs only 9 bucks delivered, and still holds a 3 Ah Bioenno, or a generic 5800 mAh LiPo battery, and a few other odds and ends.
Pouch sources and other pouch details appear at the end of this blog entry.
A Wee Bit About Sewing Bags
If you don't sew, a few points of explanation before we start may help.
1) Bags are almost always built inside out, with the sewing going on on the inside (which is the outside when the bag is inside out) - and when you're done, you pull the bag right side out.
2) Bags are usually assembled from panels - think of a panel as a side or bottom or top of the bag.
3) Almost everything that needs to be on or in the bag needs to be sewed to the panel before the panel is sewed to anything else.
4) Panels are cut to the dimension you want plus a "seam allowance". The seam allowance is the amount from the edge of the material where you will sew the seam. So if I want my bag to have a finished side of 6 by 2 inches, I'll use (in this case) a half inch seam allowance. This will result in the cut dimension of the panel being 7 by 3 inches - an extra half inch seam allowance in all directions.
5) The webbing sewed on the bag is called PALS webbing. PALS is the FLA for Pouch Attach Ladder System.
This is a standard where:
a) the webbing forming the rows is one inch wide;
b) rows are spaced apart by an inch; and
c) where vertical channels are defined by sewing vertically across the webbing every inch and a half. The extra half inch makes it easy to thread one inch webbing from whatever you want to attach to your bag through the webbing loops.
6) MOLLE means Modular Lightweight Load-carrying Equipment.
This is a system designed for the military so that bags, pouches, belts and accessories are compatible. Remember that PALS is the ladder system, MOLLE is the design spec for the equipment, and that webbing is PALS webbing, not MOLLE webbing, as it is often called. It's a small point but the difference between being a bag nerd and a bag hack. If you give a hoot :).
Let's Build a Bag
You have to start somewhere. I originally built a bag that was 3 inches by 7 inches, figuring some extra room around the radio would be helpful.
It wasn't, especially when using the bag as a chest rig. Things wobbled all over the place. So I redesigned the bag to be 2 inches by 6 inches.
A word about the depth of the bag. For the G90, you need to be able to access the buttons on the top of the radio and the jacks on the side. So the main bag can't be too long. And the depth of the bag will depend on what you have plugged in the back. I selected 8 1/2 inches as a finished depth. YMMV depending on what you have plugged into the back of the radio - think it through before you start and fit up the actual connectors and cables you'll use - it's really hard to make the bag longer later :)
A brief word about materials. I use Cordura for radio bags because it's inexpensive, rugged and easy to work with. If you make a sewing mistake, it's easy to rip the stitches and resew.
The quality Cordura is relatively water-resistant, having a water repellant coating on the outside surface and a PU coating on the inside surface. The inside is shiny because of that coating, and it's the side you want to mark on if you mark material for cutting and sewing.
Cordura comes in different thicknesses, denoted by Denier, or just the letter D. The coyote bag is built from 500 D material, the orange and black bag from 1000 D material, which is - wait for it - twice as heavy.
In the interest of brevity, I will use W for wide, H for high and L for length when describing the panels.
Here we go.
The pattern for the four side panels of the bag is drawn on the shiny side of the Cordura with a permanent silver Sharpie marker prior to cutting. I'd normally use a fabric pencil that will wash out, but used the Sharpie to make the marking easier to see.
What you see there from left to right are the front and rear panels, both 9.5 H by 7 W, which will yield panels 8.5 H by 6 W after being sewed together along the 1/2 inch seam allowances.
The next three panels are side panels 9.5 H by 3W, which will yield finished panels 8.5 H by 2 W after sewing. Yes, there's an extra panel that will be used to form cable sleeves on the side of the bag, as will be explained in a few.
But remember that first all surface features must be completed on each panel before the sides are sewn together.
Step one will be to make the front panel with its PALS webbing system. I started by hemming the top of the panel (the dark threaded line at the top). ALL THE EXPOSED ENDS NEED TO BE HEMMED TO LIMIT FRAYING.
In many instances you'll see that I've also bound the exposed edges for additional durability (it covers the raw edge of the folded over hemmed edge). Contrasting binding also provides some visual interest. You don't need to, but it's a nice touch.
Binding (the process) is done with black 1 inch wide binding (the material) called grosgrain. You fold it in half along the edge and sew it on. If you're lucky, you or your sewing friend has a "binder" that automatically feeds the grosgrain while you tuck in the edge. A picture of that process is below, just FYI. It's a handy thing to have. If you don't have a binder and want to bind, you can tape both sides of the binding on with two way "seam tape" that will hold the binding on while you sew.
If you look closely below you'll see the PALS grid (in the dimensions already given) marked on the outer (good) surface of the panel with a fabric pencil. I know I said don't mark the good surface but here you don't have a choice. This makes it easy to align the webbing when sewing along the vertical lines that define the channels. The fabric pencil wipes off or washes out, so it's not fatal to mark the good surface of the panel like this.
In the next two pictures you can see the panels cut, with their top edges hemmed. The PALS webbing (1 inch wide, 7 inches long) is already sewed onto the front panel. You can see grosgrain binding applied to the top and bottom of the cable channel covers for the two sides of the bag. In the second picture, you see that the cable sleeve covers have been sewed to the sides. The four sides are now ready for sewing together.
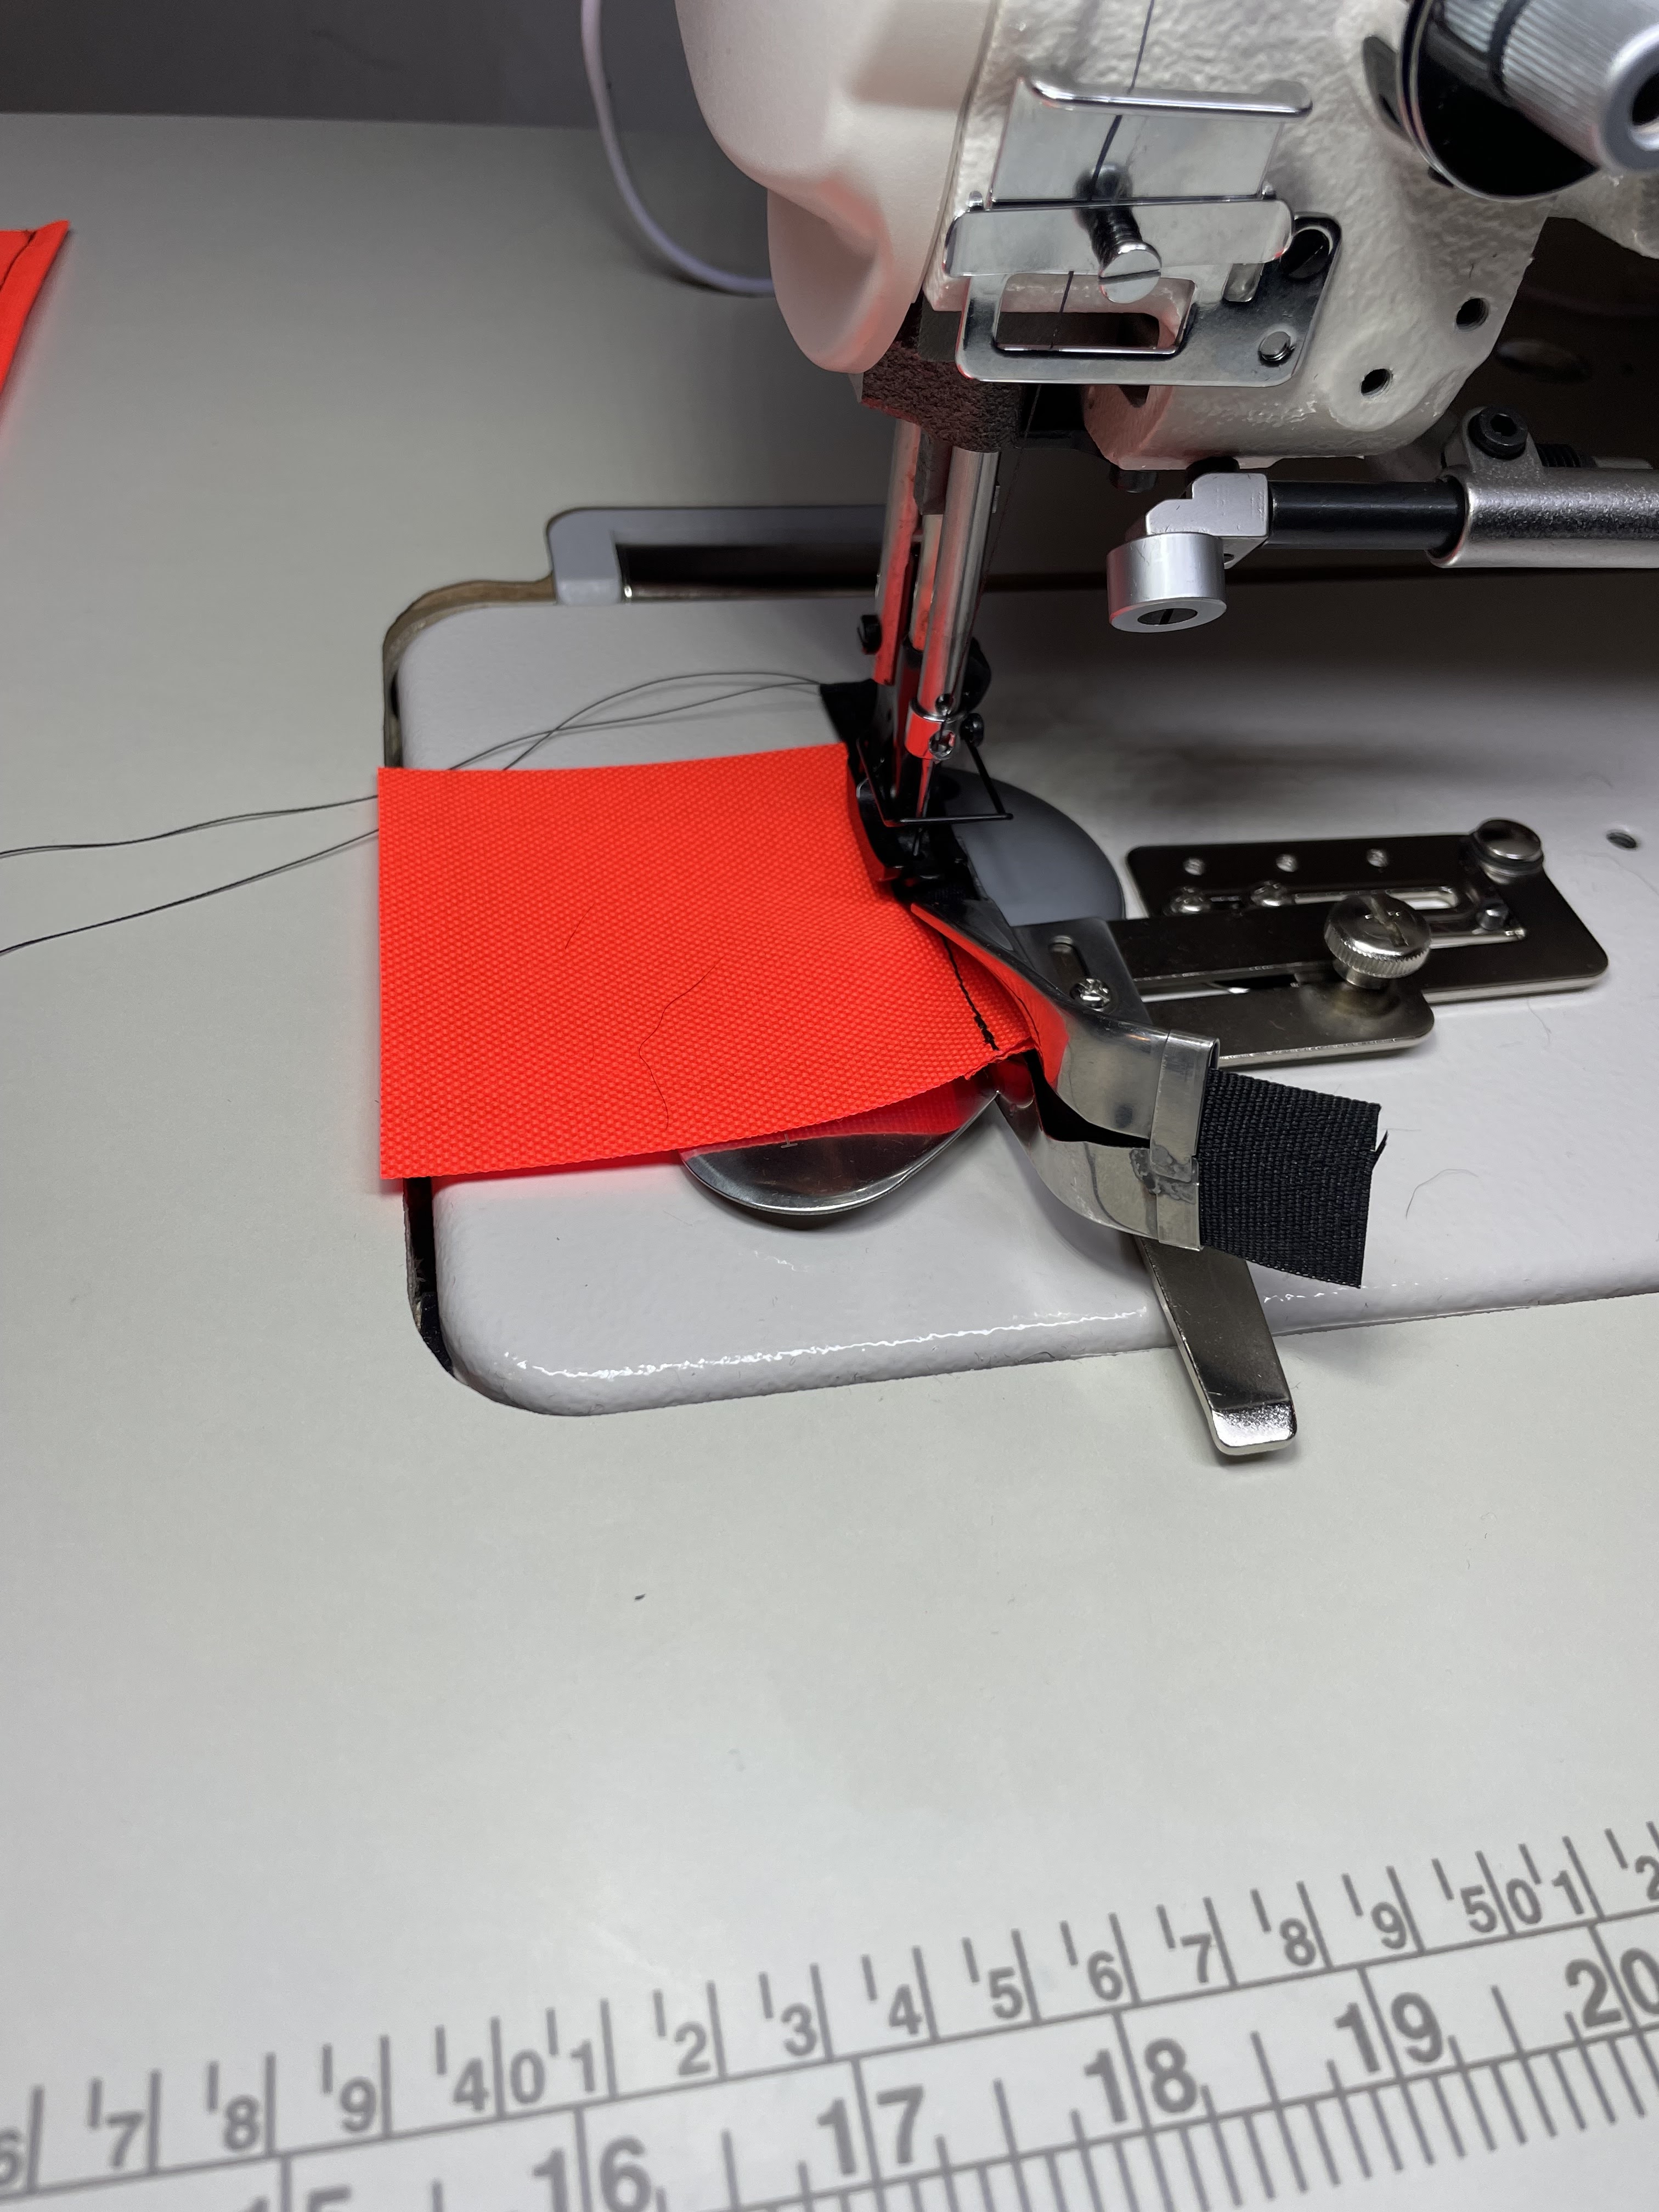
In the next picture, we're ready to sew a side to the front of the bag. The two sides are placed "right sides together", in other words, the good, outside surfaces are touching, and the inside surfaces - the shiny sides - are on the outside. This makes sense if you remember we're building the bag inside out.
Two binder clips hold the pieces together so they don't shift while sewing. We will sew straight down the silver line just to the left of the binder clips - the seam allowance as marked.
We'll do this three more times until all the sides of the bag are sewn together as shown in the picture below, leaving us with an inside out tube.

Note the two strap loops sticking into the inside of the bag near the bottom. If you're building this bag to use as a chest rig, you need those loops for your bottom attachment points of the four point harness. The loops are made from a 6 inch long piece of 1 inch webbing that is doubled over to form a 3 inch strap loop for attaching a buckle. NB: In retrospect, using an 8 inch piece of strap leaves more loop above the top of the lid, which makes it easier to attach the hardware. There's always rev.2.
If you need these loops, they need to be sewed into the side seam of the bag when you are sewing it together. Because the bag is inside out, they are on the inside when it's first sewed. It will help to look at the outside pic of the bag under Straps and Buckles later on to better understand the positioning.
Making the bottom of the bag
To finish building our inside out main portion of the radio bag, we need to build the bottom panel.
Because we want flexibility for cables to exit the bottom of the bag on both sides, we need to make a panel 7 L by 3 W so that when sewed along the seam allowances it will fill the 6 L by 2 W "hole" in the bottom of the bag, and have a cable outlet near each end.
So that cables can exit this panel, we will make three subpanels that overlap when sewed together along the sides. This leaves an exit slot at each end for the cables. In the picture below, the edges of the subpanels that are exposed have been bound, and then will be sewn together along the edges as the panels are laid out - with the small overlap suggested by the layout in the picture. You can see the assembled panel and black thread that connects them where the panels are sewn together in the picture following this one.
This picture shows the finished bottom panel clipped to the four sides of the bag sewn earlier and ready for sewing in the bottom panel. You will sew along the silver box defined by the seam allowances to finish the bag. Again, the shiny side is out, as the bag is still being built inside out.
And this is the completed bottom portion of the bag, ready for turning inside out.
As a final anal retentive step, I bound all the inside edges of the bag. You don't need to do this, as it's unlikely your bag will get enough use that the edges of the coated material will fray badly. But it's insurance and adds a very nice finished appearance to the inside of the bag.
And there's the bag turned inside out, with the radio in it, just to be sure it fits!! And it does, nicely.
Let's Build a Top
If all you want is a chest rig, you may not need a top for the bag. But even then, it's good to cover the face of the radio. So let's build a top.
We'll do this quickly, mostly with pics, as the process is the same as the main bag.
Through experimentation, it seemed the best top dimension would be 6 1/2 W, 2 1/2 L and 3 D. This allows the top to slide over the main bag, with enough extra to allow for the antenna mount.
This makes the panels with seam allowances:
a) front and back 7 1/2 by 4
b) sides 3 1/2 by 4; and
c) the top 4 by 7 1/2.
The marked, uncut side panels, and all the cut panels, are in the two pics below.
Two points here.
First, you can save waste and work by marking and cutting panels with a common dimension like in the first pic - at least one common dimension will be correct :).
Second, when the panels are all cut, align them like in the second picture (with edges that will be sewed together next to each other) - you will see immediately if any dimension is off - it's easy to make a mistake.
Now we start sewing parts together just like before. The first picture shows the front and back sewed to the top, and the second picture shows all sides sewn together. You can see I bound the bottom edges of these parts. Again, you don't have to, but for long term durability it's a good idea. Even unbound (but hemmed) I think the bag will outlast the G90 - that's not a dis, just a fact.
THERE IS ONE IMPORTANT DIFFERENCE. Do not sew the back to the top for 1 3/4 inches from each outer finished edge. This will leave a passthrough for the two straps loops that will connect the top to the bottom and will pass through the top for attaching a buckle later. If you look closely at the righthand picture, you can see two wide silver lines I drew to remind myself not to sew those areas.
Now it gets tricky. The top is finished but inside out. We need to attach two strap loops to the main bag that will attach the main bag to the top, and extend out the top to receive a couple buckles.
Study the picture below a bit. At the top edge of the main bag you will see what looks like two black straps extending from the top edge of the main bag into the lid.
Those are loops made from a doubled-over piece of 1 inch webbing at least 6 inches long (so that when doubled-over to form the loop the loop is at least 3 inches long).
The two cut ends of the loop are sewed down at the top of the main bag. The loop then passes through the SLITS THAT WE DID NOT SEW SHUT PER THE LAST CAPITAL LETTER INSTRUCTION. The top gets sewn to the loop along the open seam allowance of the bag on each side.
This is a good place to talk about the wisdom of pinning and fitting before sewing. You need for the top to be sewed to the loop at a location that will cause the top to slightly overlap the bottom when the top is reversed.
Also, you may think you know the right orientation when the bag is inside out - but it's smart to pin the loops in and reverse the top to make sure everything is properly oriented. When you're doing things inside out and reversing when you're done, you'd be surprised how often you can't guess how things should go together....there are two possible orientations of the top and the loops, use the one in this picture. There is an earlier picture, you can guess why I can't use that one....)
Because I did it before, I bound the inside edges of the top. I don't want to build another one of these any time soon. If you've done things right, you can reverse the top and it will look like this.
Now you don't have to sew the top to the straps. If you don't you can take the top completely off. I thought this was a good idea for the chest rig. After 10 days of hiking around in the Rockies I'm certain the top should be sewn onto the bag - it's easy to lose and not worth the on and offing. I just tuck the lid under the radio now like this and I'm fine.
Straps and Buckles!
We're almost done. Now that the bag is done you need to decide how you want to use it, and add the appropriate straps and buckle.
The first picture below shows the straps and buckles on my bag that let it be used as a chest rig. You'll also see a strap grab handle I sewed on the bag back as an experiment. It's helpful, but not as useful as I hoped. If you decide to add one, remember to sew it on before you put the panels together. I didn't do that, and it's a bear to add later, and maybe not worth the work, there's an alternative as you'll see in a minute.
The buckles are quick connect (QD) 1 inch female side release Duraflex buckles. In the second picture you'll see a standard (not QD) Duraflex buckle set. What's the difference? On one set, I used a Dremel tool with a cutting wheel to make a slot in the buckle. This turns it into a quick connect buckle that costs a lot less than a factory made QD buckle. It's a wee bit of effort but the buckle will slip over the loop, and can be removed without any sewing if it breaks or if you want to change the configuration of the straps.
If you're not familiar with how a chest rig works, here's a picture of the rev.0 coyote bag.
The radio bag connects to a four point harness at the buckles. Those straps are connected at a common point on a back panel (not shown).
You'd normally wear a chest rig higher than this, but you need to reach the radio knobs comfortably, and be able to read the panel, so this works best for me.
MOLLE Pouches! (We're about finished!)
A large part of this exercise was to find an easy way to integrate an antenna and battery holder with the G90 into a simple grab and go system that you can carry and operate.
If you've seen the G90 Handheld article on this blog you've seen how to build the antenna bracket.
The pouches for batteries and accessories can be anything that fits on the radio bag's PALS webbing.
As far as small bags go, I really like the black one on the rev.1 bag. This pouch uses two columns of the PALS system, so you could use two of these bags next to each other if you need additional space.
But this single case, mounted in the center of the radio bag, is large enough to hold a 3 amp-hour Bioenno battery, one of my favorites, as well as a few small things you can cram around it. Additionally, the black pouch has its own laser cut PALS panel on its front, so you could add another small pouch to it if you wanted - a tiny one for a key, small multi-tool, light, etc. Or just slip your light or tool in the front-facing webbing if it has a clip.
This is the eBay listing for that black pouch. Nine bucks and free shipping. Hard to beat! But it's nowhere near the quality of the coyote pouch.
If you'd like a bigger pouch I'd recommend something like the one I used with the Rev. 0 bag in Colorado earlier this month. You can see it here. This bag is high quality mil surplus and a great fit for a coyote-colored bag. And it will hold a ton of stuff as well: big battery, log, headphones, key, and maybe even some snacks. At 25 bucks it's pricier, but that's for a brand new pouch. You can find used ones cheaper if you must.
The eBay listing for this bag is here.

And of course there is just a cornucopia of MOLLE pouches available. That's kinda the point. Once you've created a flexible MOLLE-compatible radio bag, you can fine tune it easily.
The Bottom Line
That was long and tedious, and I expect not much fun unless you hope to build a custom bag for your G90, or have made friends with someone who might.
But I had a ball with the rev.0 bag in Colorado earlier this month. I managed a 13 QSO POTA activation walking around with the manpack, and a 60 QSO POTA operation operating from the bag sitting on a mountain.
The rev.0 bag was good, and I'm looking forward to using the rev.1 bag with its vastly improved cable management this weekend for Field Day when I get back from our club operation.
As always, I blog about my experiences - these are not recommendations, just a recitation of facts. It's up to you to make the decisions that keep your operation safe - look out for people, animals, wires - electrified and others, RF safety - and damn near everything else if you're walking around with a manpack while operating.
72/73 Scott ka9p/zf2sc


Comments