WTF? (What's That For?) A Nearly Universal Radio Carrier for Almost Any Pack AKA "Shack In a Pack"
Executive Summary
If you're still reading this blog, clearly you have no regard for productive use of your time, so, really, do we need an Executive Summary to help you manage it?
Still, old habits are hard to break, and you may have just jumped in, so here we go. In this post, I will:
1) Explain why a Shack in a Pack; and
2) Provide an overview of its functionality
WTF? (What's That For?) A Nearly Universal Radio Carrier for Almost Any Pack AKA "Shack In a Pack"
Why a Shack in a Pack?
Thanks for asking.
There's no right or wrong way to operate a portable radio station. You should do what works for you. Fit for purpose. Your use case. Or cases.
Some people pride themselves on having a modular system with everything in neatly identified cases that can be mixed or matched as needed. They may enjoy the process of packing, setting up and tearing down.
I don't.
For me, it's heading out for the day, radio and lunch tucked in a ruck, with maybe a burner for hot food and coffee if it's cold. I'm not climbing a summit, I don't need to be lightweight. I just want to have fun on my terms, and a decent lunch.
I want my radio to be protected, but maybe not caged like an animal. Though sometimes, in really bad weather, I might.
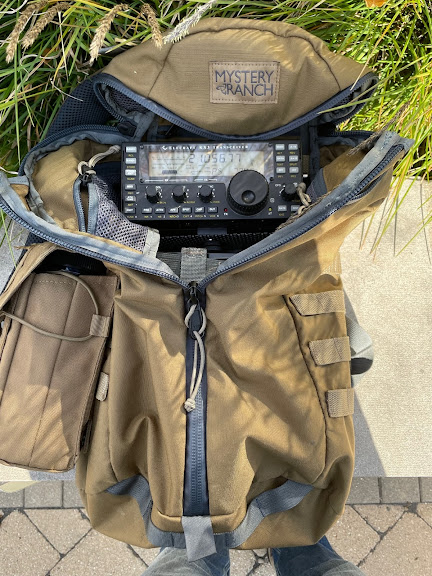
I want to be able to operate my radio from the pack, with everything hooked up and ready to go. Just string the antenna.
I want my set up to look like this.
Pull a zipper or two, attach an antenna, and operate the radio.
Except on any given Sunday, I may want a different pack, or a different radio, with more or less battery.
And when I hike, I want the heavy stuff to be fixed in the pack, so that the radio is safe and the load is stable.
Who does that? Well, the guys whose faces are usually blurred out when keeping us safe, for one.
This led me to research first responder and military solutions. I looked for an affordable off-the-shelf-solution.
There were some useful, inexpensive surplus radio bags and pouches, and some elegant solutions for particular radio systems.
But I like my hiking packs, and really didn't want to invest in something new, only to have to work out some tricky mods to make it work for me.
One idea that kept popping up was to have one bag with mission-specific inserts. Each insert is fitted with what's needed for that mission. Pull one out, stick one in. Great solution.
But maybe overkill for me. I have multiple radios, but not multiple big batteries or headsets. . And I'm not sure there's room in the closet for a bevy of inserts.
Still, an insert appealed to me. By picking and choosing ideas from the pouches and packs I'd reviewed, I might be able to make a single affordable, adaptable insert.
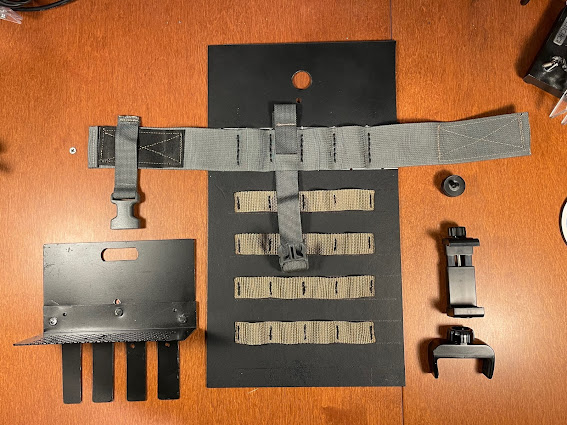
I came up with this.
The black plate is a Kydex insert that doubles as a frame sheet. At 0.08 inch thick, it's stiff enough to support and transfer the weight of heavy radios and accessories.
Stitched onto the Kydex board are PALS webbing straps. The gold straps are standard PALS webbing dimensions. The large green webbing is a double-width strap. This wide strap is fitted with VELCRO patches to make an adjustable length belt for wrapping around radios, batteries or other large heavy objects.
The narrow green straps running down from the wide green strap are adjustable and support the bottom of an upward-facing radio with a format like an FT-817 or IC-703/6, or a battery. The green webbing pieces cooperate to make a sling adjustable in height and circumference.
Lest you doubt this will handle a ICOM 706-sized radio (I had my doubts) here are shots of my IC706 MK2G and a 9 aH battery strapped to the bottom of the carrier.
The sling easily fits and holds the 706. Not the rig I'd usually run, but this made me wish that I'd kept my 703, for sure. An FT-817 would be child's play, as would an FT-891.
A potential difficulty with this configuration is finding a place where the small strap under the radio can support the back of the radio without interfering with a control cable. No problem yet.
If all you wanted to do was open the top of your pack and operate an FT-817 or IC-703 facing up, the sling would be enough.
But many popular QRP rigs like IC-705s, Xiegus, and the KX-series Elecrafts have formats with large forward-facing displays more suited to operation from clamshell or other forward-opening packs.
Accommodating such a wide range of radio formats required more. Flexibility required a load-bearing shelf
The shelf is the four-pronged black object at the bottom left of the picture just above. The four prongs of the shelf fit into four MOLLE-compatible slots formed by stitching the wide green strap to the frame sheet.
This pair of images shows an IC-705 mounted on the load-bearing shelf for forward and upward-facing operation, respectively.
Mounting an IC-705 to the shelf is easy - a single hole to allow a 1/4-20 screw to mate with the 705's 1/4-20 threaded receiver located on the 705's bottom plate. This enables a forward-looking radio on a shelf like in the Icom LC-192.
If you have a backpack that "top opens" rather than "front opens", you need the radio to face up. That only requires a hole in the back plate of the shelf assembly (instead of the bottom) and Bob's your uncle, as they say.
Unfortunately. the KX-series of radios, and many Xiegus, lack a rugged 1/4-20 receiver or other easy attachment point.
Enter the adjustable GPS/phone mount. Many might work, but the selected mount has a screw-driven clamp and 2 1/4-20 receivers. The two receivers let you use standard 1/4-20 camera hardware to attach the clamp to the load-bearing shelf such that the radio can be oriented looking forward from the pack, or out the top of the pack.
This pic is a side view of the KX-3 clamped into the GPS mount for forward-facing operation. The shelf is inserted into the frame sheet's double wide PALS webbing (the wide green one we talked about earlier).
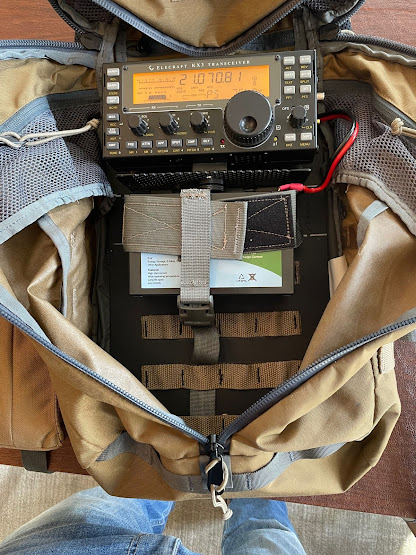
The final pic below shows the same arrangement from the front, with the insert installed in a modified Mystery Ranch Urban Assault 18 pack, and with a 9 amp hour battery fixed in the radio/battery sling.


Comments